How Shelly and Roy Grow Tomatoes
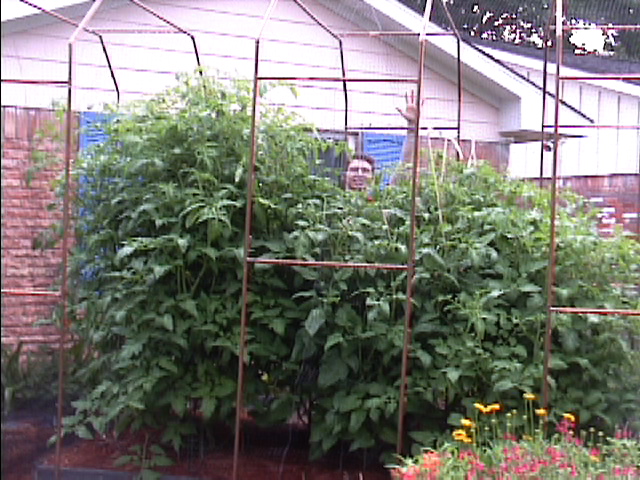
Our tomato bed, April 29, 2003
See how they're growing this year at our other website.
Raised Bed Building
Recommended Varieties
Growing Under Lights
Worm Tea
Charles Wilbur's Techniques
Photo Album
Shelly's peppers
Since 1998, we have been assiduously refining our techniques to grow the biggest, healthiest, most productive, and tastiest tomatoes possible in Houston. There will always be room for improvement, but we have at least gotten enough things right to have some pretty impressive results. People who have seen our plants often ask us how we do it, so we have collected our techniques here.
These techniques are not the most cost-effective, nor the least labor-intensive possible ways to get good results. Gardening is a hobby for us, and like most hobbyists, we put more time and money into it than would those who are trying to do it as a business. Nor are they necessarily the best methods for everyone. Houston offers unique challenges in soil and climate that we have to address. Your area may require quite different methods.
The soil
The Houston area has three different major soil zones. Most of it, including our area, has a dense, alkaline clay locally referred to as "gumbo". To grow huge plants, you need a huge root system, and you simply cannot get that here in the native clay. Raised beds are a must with all the rain we normally receive. Our beds are 12 inches high and 4 feet wide by 8 feet long. Read all about how we built ours.
Every gardener knows that organic matter (OM) is nearly synonymous with soil health. In Houston, the heat causes rapid breakdown of OM, so if you start with beds of pure compost, you will be fighting a continual battle against subsidence. We opted for a 70% sand, 30% organic mix initially.
Each spring before planting tomatoes, we add 2 bags of composted sheep manure, 1 bag of composted chicken manure, and 1 bag of composted rice hulls to replenish each bed. (Each bed in the garden gets a slightly different set of additives before planting, dependent upon the upcoming crop.)
Sandy soil is very conducive to root-knot nematodes, and we have had to contend with them for years. As our soil is enriched year by year, they seem to be less of a problem. We've also begun adding a chitin-based product to the beds before planting in the spring and the fall. Time will tell whether that is of significant help.
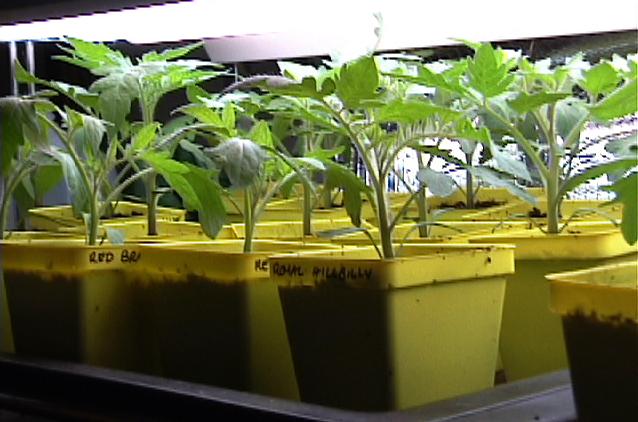
Growing transplants from seed
We are continually trialing varieties to see which ones excel under our conditions (see our recommendations). To ensure that we can try the ones we want, we grow them from seed. Of course, growing just enough for ourselves would mean having a bunch of unused seed, unused light table space, and potting mix. To put them to good use and recoup some costs, we produce a couple hundred seedlings per year, for sale to friends and a local feed/fertilizer store.
We start our seeds in "APS" self-watering trays from Gardener's Supply Company in our own custom seedling mix (see recipes). We soak the seed for anywhere from a few hours to almost 24 hours (dependent entirely upon how busy we are at the time), then plant it about 1/8 inch deep. When it's cold in the house, we put them on our light table (also from Gardener’s) with the dome on until the first seedlings emerge, usually around the 5th day. (Otherwise, they sit on the dining room table with their dome on until the first seedling emerges, then they move to the light table.) As soon as a couple of seedlings are up, we remove the dome.
(More about growing under lights)
They remain in the APS until the 16th day from planting, at which point they will have some true leaves and be ready for potting up into 4 inch pots (using our potting up mix – see recipes). The APS systems provide water from the bottom, but once the plants are potted up into individual pots, we water from the top, trying to minimize the amount we get on the foliage.
After spending a few more days on the light table to adjust, they are ready for hardening off. In hardening off, we are more concerned with their ability to endure sun and wind than in adjusting to cool temperatures, so we do not put them out when the temperatures are below 45 F (7 C), which causes a lasting slowdown in growth. Slugs are also a serious problem, so we do not leave them out overnight if slugs are abundant. In previous years, we started them off near a pine tree which shaded them from midday sun, and over a period of several days, moved them to get more exposure until they could tolerate the full sun without burning. Now we have 30% shade cloth, which seems to be just the right amount of protection for the transition, so there's no need for gradual adjustment.
They are ready for sale around day 25. We pot our personal ones up into gallon pots (more potting up mix) around day 28 to get another two weeks of growth before planting them out in the garden. At planting out, they will be about 14 inches tall with a leaf-spread of about 16 to 18 inches. They will have been acclimated to the sun and wind for several weeks at this point; they will get acclimated to night-time temperatures immediately before planting out.
Planting out
The "safe" time to plant out in Houston is March 11 (10% frost date). Some people are looking for tomato transplants by the end of January, but it's a rare year that you won't get frosts later than that. Valentine's Day is fine for optimists (50% frost date), but the late freezes of recent years have convinced us simply to wait a few weeks. They grow well in pots; they're easy to protect from the freak cold if they are in pots, too. We have been planting out on or about March 1 for the past few years (10 days prior to our 10% frost date).
There are four basic issues that are usually considered in planting out:
- amending the soil in your planting area
- adding stuff to the hole
- removing leaves
- planting deep
We do add stuff to the hole, and it varies from year to year. It always includes our organic dry fertilizer mix (see recipes) and homegrown worm compost. We may add some wood ashes, molasses, corn meal, or whatever we've heard good things about recently to the hole as well. We have no definitive recommendations for fertilizer, except to ensure that there is phosphorus near the roots. Phosphorus does not migrate much in the soil, and it is vital to young plants' health.
We do not remove leaves at planting time. Typically, the transplanting affects how well the plants can transpire water, and so there is some wilting. If some of the leaves become permanently wilted, we remove them. Other than that, we leave them on to make food for the plant.
Because we are planting from gallons, we do not need to plant them much deeper than they are in the pots. We do make a ridge of soil in a ring around each plant to help channel water to the root zone.
Immediately after planting, we put small cages around them, and wrap the cages in row cover if any adverse weather is expected. Again, we don't want them to be slowed down by cold or beaten up and dried out by high winds. We may need the row covers for as long as a month, leaving the top of the cage open during the day and closing it at night.
Mulching
Mulching is essential in Houston's heat. We collect oak leaves that people in our neighborhood have bagged and set out by the curb. We chop them and apply about an inch thick to help retain moisture in the soil and to give the worms something to snack on. Then we top with pine needles, also collected from the neighborhood, to make a fluffy insulating layer 2 or 3 inches thick.
Using unchopped leaves would be a mistake, as they tend to mat together and cause water to run off. We do use them to mulch the walkways between the beds.
Fertilizing
A regular fertilization schedule ensures that the plants lack for nothing in terms of nutrition. Our regimen is to spray the foliage with enriched worm tea, as well as pouring it on the root zone. Update 2005: This year, we did not fertilize after planting. The plants did super, so it seems that our soil (as amended for planting) is sufficient for our growing season without additional fertilization.
Caging and pruning
Historically, we have tried to grow too many plants in a bed. We just want to grow more plants than we have space for, so they have been crammed in. Each year, we have reduced the number (in 2001, we grew 14; in 2002, we grew 10; in 2003, we grew 6; for 2004, we're growing 5). If we pruned religiously, we could probably grow as many as 8 plants reasonably well, but we don't. Our pruning is limited to removing diseased foliage, taking out internal growth that doesn't receive any light, and stopping certain overachievers from completely taking over their neighbors' space.
We currently cage our plants with Park's tomato pens, which are stackable for the height we need, and which fold flat for storage. They are, however, significantly undersized for serious tomato growing, at only 14 inches across. We have seen and love the Texas Tomato Cages, but they are rather pricey. Maybe if we win Lotto someday, we can spring for some of those!
The pruning method we aspire to use is Charles Wilber's technique, of pruning to a limited number of suckers, each of which is assigned its own vertical bar on the cage to grow up.
Pests & Problems
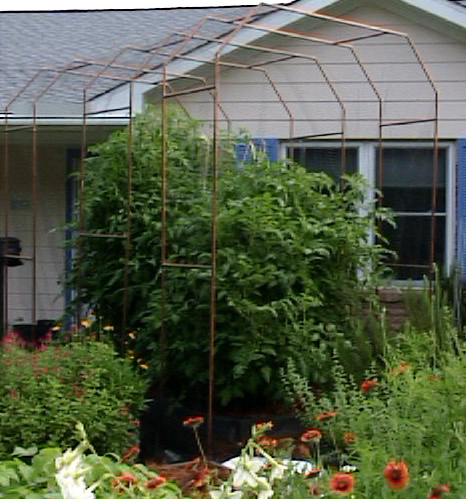
The biggest tomato pest in Houston might be mockingbirds. They find those ripening fruits, peck a nasty hole, then move on to the next one. They are very brave birds, as well as intelligent, so most gimmicks intended to frighten them are ineffective. Bird netting, however, is very effective. And you have got to see the structure we rigged up this year to support it.
The only pesticide we use is Bt (a toxin produced by a bacterium that infects caterpillars). That means we have to do a lot of monitoring and hand-picking of stink bugs, as well as armyworms, which are immune to Bt. Shelly has good eyes, and can spot a recent hatch of caterpillars before they have dispersed throughout the plants, and so can often thwart an infestation by simply removing one leaflet.
Later in the season, the stink bugs (really leaf-footed bugs) come. You cannot fight the stink bugs. There are just too many. You will see a whole herd of young ones on a fruit, and they will scamper to the side of the fruit away from you. It's hard to squish them without damaging the fruit. And there are just so many! The adults are worse, because they're tougher and you have to get them one at a time. And they fly.
We get various leaf blights (likely Early Blight) here, but do not spray for them. Picking off affected foliage seems to keep it under control unless we get some major rain storms.
Yes, that means that we use no "cides" of any kind, man-made or "natural", except for the rare use of Bt.
Harvest!
Since we start with large plants, they may be flowering as we plant them, or will begin shortly thereafter. Fruits will set most abundantly during April and into early May, if the weather cooperates with reasonable nighttime temperatures and low humidity. The earliest fruits will begin ripening around the beginning of May.
The season begins to wind down in late May. By June, foliage diseases are getting a strong foothold, the heat is making the plants struggle just to hang on, and the leaf-footed bugs are making the small, misshapen fruits even less palatable. Let any nice ones left on the plants ripen up, and then take the plants out. If a tropical system moves in, we'll often lose the plants within a week due to the solid rain the systems bring. (In 2001, the tomatoes were pulled out on June 17 after 12 days of almost solid rain due to TS Allison.)
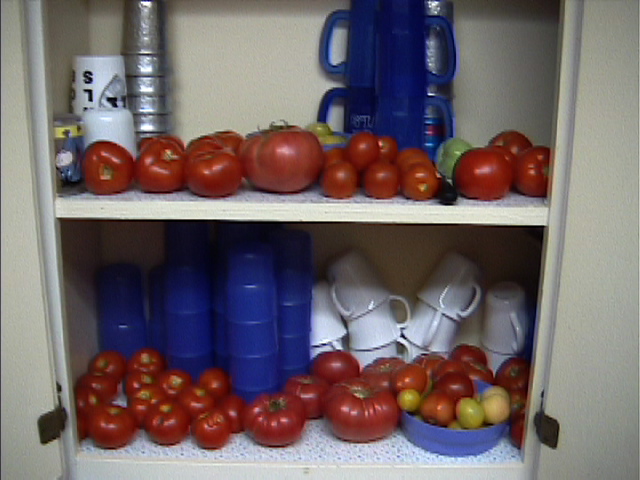
Harvested tomatoes as of May 16, 2002
For more photos, visit our photo albums.